How to use Awesome TTS for Language Learning (including a tip on using it for “free”)
People often ask us what our favourite Anki plugins are for language learning.
For a long time, I was averse to using plugins. Plugins usually slow things down and rarely add much.
But after I started using AwesomeTTS, it quickly became my favourite Anki plugin, and I’m just hoping the developer keeps it updated (so far, so good).
You can pay for AwesomeTTS, but I also figured out a way to basically use it for free with a Microsoft Azure license key. It’s not “free”, but with 500000 free characters a month (which would be way more than any human would need), it’s effectively free for an individual user.
Since writing this article, I’ve also been enjoying using the ElevenLabs natural language API. It’s also “free” — but that’s because it’s in beta. Also, there are very limited languages offered (mostly European ones, plus Hindi). Test it out here.
Here’s a quick guide to:
- Why we love the AwesomeTTS Anki plugin
- How to use AwesomeTTS for language learning, and
- How to increase your limits with AwesomeTTS, either by paying for it to the creator, or by getting an Azure license key.
If you’re just getting started with Anki, you might want to read our guide to getting started with Anki before going very far.
Contents
What is AwesomeTTS?
In a nutshell, AwesomeTTS is an Anki plugin that converts text to speech.
The “TTS” part of AwesomeTTS stands for “Text to Speech”. It’s a bit of an old-school tech acronym, but still used.
In other words, AwesomeTTS reads out fields in your Anki cards to you. You can add natural-sounding speech to your cards, based just on the data in the cards.
You can use Awesome TTS to
- Bulk add audio to a bunch of cards, based on the content in one field
- Add audio one by one to cards as you’re making them
- Get it to read out a sentence you’re learning (without making a card)
The reason the AwesomeTTS Anki plugin is useful is that it lets you learn how to pronounce things without a teacher or going to Google Translate or some other source to learn how to pronounce a word.
I find audio cards very useful as I’m an aural learner.
The audio is very natural (when you use the right services). There are examples in a number of languages below.
AwesomeTTS connects to a plethora of services around the world, from large (e.g. Google, Microsoft Azure) to small but great (e.g. Naver, Forvo, Youdao). You give it a phrase in any language (in native script, where relevant) and it pronounces it for you and lets you automatically download the file into your Anki deck.
There are many services to which AwesomeTTS connects that aren’t that great. But the Microsoft Azure Neural TTS service has very natural-sounding voices for every language that we study.
Here are some examples below of the Microsoft Azure voices.
The Microsoft Azure text to speech engine is easily my favourite. I compared it to Google, Amazon, and a few other services and it’s always either comparably good or better. (Some of the other engines that come from one country have a larger range of voices in a specific language, e.g. Korean or Chinese.)
Plus, Azure has the widest range of supported languages (including some of the less supported languages I’m learning, like Swahili — even with a choice of accents!), by far.
Note: The only voice I haven’t put up there (that I’m learning) is Arabic. This is because Azure (just like most services) tend to assume you want an MSA transliteration — which isn’t the case, as I learn colloquial languages.
For example, translating “salam 3alaikum” comes out as “salaam-un 3alaikum” which is unnecessarily standard for Egypt. I could tweak it to get it to pronounce it naturally, but that implies one already knows how to pronounce it naturally, which isn’t always the case for language learners.
Why use AwesomeTTS for effective language learning
AwesomeTTS is a really useful Anki plugin if you’re trying to drill the audio of a language you’re learning. This is useful to help you with comprehension.
It’s also useful to have audio for cards when you want a voice to repeat after.
We use Anki decks that have three-five fields (usually th
- Native language (English for us)
- Target language
- Target language audio
In the past I’ve used two other fields
- Native language audio — I don’t use this. I find it distracting to hear my native language when I’m trying to drill the audio for the target language
- Target language transliteration — I prefer to listen, or to use the characters. I use this sometimes just for Chinese, but I don’t need a separate field for it.
So a typical prompt for our Anki flashcards is either
- Question: “I really like eggplant”
- Answer: “Me encanta la berenjena” + audio reading it out
Or the other way around (target + audio), with the answer being the meaning in my native language.
Sometimes, for the audio fields, I record the sound of my own voice. This is fine and it’s actually a really great way to get started. Recording my own voice means I need to train myself to hear the new sounds and then to make them.
The benefit of recording my own voice is that it helps me believe that I can speak this language. I can hear myself speaking it constantly!
But the downsides of recording my own voice are that
- I need a quiet place to record. In places where I study there’s often some background noise. I often study while going on a walk, in a cafe, at the gym, or just in my own house. Could be people talking, traffic, birds chirping, and in some of my cards, a baby crying (not even my baby!)
- I need a quiet time to record. I like to study early in the morning, which means there’s a risk I’ll wake up other people in the house or neighbours.
- I might get the pronunciation wrong. I try hard, but in some of my early cards I inevitably get it wrong and accidentally drill myself on the wrong pronunciation.
So while recording myself is great, I save it for discrete periods when I have time — and Arabic, which doesn’t have a useful TTS for dialects.
This is the advantage of an Anki plugin like AwesomeTTS — you don’t have to record your own voice to add an accurate voice showing you how to say something in a foreign language.
How to set up AwesomeTTS (options)
As it’s an Anki plugin, you have to set up AwesomeTTS separately.
First, you have to download and install it — go here and follow those instructions.
The interface for AwesomeTTS is definitely one designed by computer programmers. It’s a bit like the rest of Anki — overwhelming at first.
But here are the core ways to configure it to make it really easy to use.
First bear in mind the three ways you might use it.
- Mass-generating audio for a bunch of cards you created that have a standard format
- Generating audio for a single card, particularly if you want to generate audio for just a bit of it, or if it’s a card with a non-standard format
- Doing on-the-fly pronunciation from the main window (when you’re wondering “how do I pronounce this word again?”)
Here’s how to set up AwesomeTTS for the above language-learning situations.
- Set up your shortcut keys. I use command-T on Mac (or control-T on Windows) for most options, as the default, and use command-Y (control-Y) to generate a single audio file, which is useful some time.
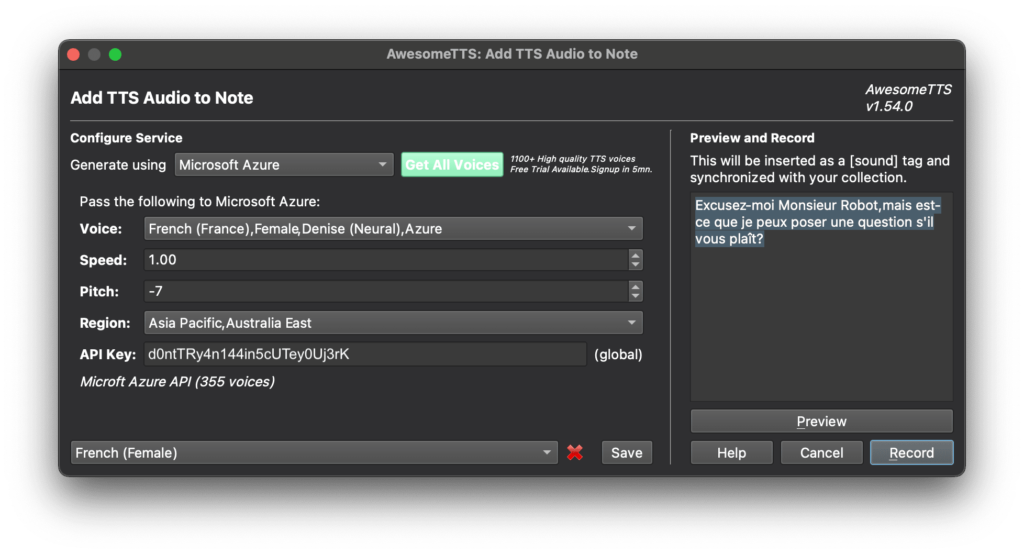
- Set up your voices. I recommend using Azure for most voices for simplicity. Choose a server you’re likely to use when getting your API key (e.g. if you live in SE Asia, use a server in SE Asia)
- Optional — set up your filename format. I set my filenames to be human readable, so maybe I can copy the files and use them later (though in a year of using AwesomeTTS I have never done this).
The best voices in AwesomeTTS
Even though the AwesomeTTS Anki plugin has many language/voice options, there are a few that are a cut above the rest.
It can be pretty overwhelming going through all the AwesomeTTS voice options and finding the best ones.
Luckily, we like to learn many languages, and have a good ear for what’s a good voice.
The TL;DR is that Microsoft Azure has the most natural pronunciation (either the best or as good as the best) for most languages.
But other services have good voice for just some languages.
E.g.
- Naver Clova Premium is good for Japanese and Chinese
- Baidu Speech is good for Chinese
- IBM Watson is good for a small set of languages
ElevenLabs has AI-powered voice generation, and getting an API key is easier. It’s pretty cool, but it’s more limited in languages it supports. And the API key is only good for about 100-200 sentences a month.
But none of those is better than Azure, so I find it much simpler to think of Azure as being your only option.
On top of that, Azure is the best option for many languages, and the only option for a number of languages including Swahili, Zulu, Uzbek, Persian, and many accents of Arabic.
Where to get source material for AwesomeTTS
You might be wondering “wait, how do I find sample sentences to put into my cards for AwesomeTTS to read out”?
This is my “one sentence a day” language learning technique. I go over it in this post, but essentially, it’s to learn sentences either from:
- Google Translate, plus modifications based on your knowledge of the language (e.g. to change the gender or level of formality of a sentence)
- Textbooks
- ChatGPT to create sample sentences (especially if using GPT4)
- Sentence banks like Glossika or Speechling
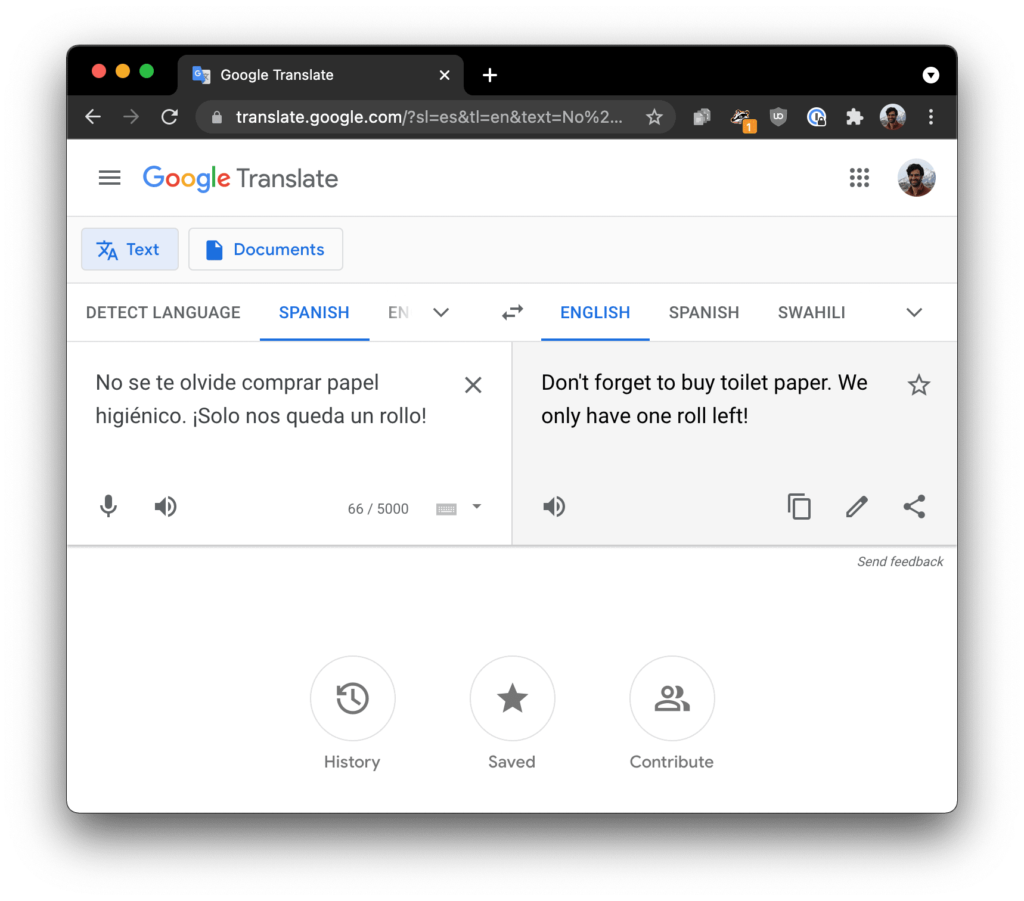
There are tons of sentences around these days — it’s easy to find something you’re looking for without having to craft your own from scratch (and risk getting it wrong).
How to increase your limit with AwesomeTTS
When you start using AwesomeTTS, you can get a trial subscription by signing up with your email address. This gets you 10,000 characters-worth of translation for all the services, which adds up to about 2000 words, or maybe 200 cards before you run out (assuming you have some longer words, and example sentences).
To get up to 100,000 characters, he asks that you leave a review (presumably positive) in Anki. I don’t like being rewarded for reviews (and some systems would expel the app for this), but I do genuinely like the service.
Finally, if you want to increase your limit even further you have two options: either a) pay a small monthly fee to join the owner’s Patreon, or b) get an Azure account.
I have nothing against joining a Patreon, and so if you don’t mind paying $5 a month, then I encourage you to support Luc and his development of it. This is definitely the easiest path forwards.
But if you want an alternative that’s “almost free” (it basically is, because the limits are so high), then create an Azure API key for TTS and use that. It’s a little complicated but here’s how to do it below.
I recommend the Azure one above all the others (and I’ve compared it to Google TTS, IBM Watson, and Amazon) because
- It has the most languages
- The pronunciation (particularly from the “Neural” voices) is very natural (see the examples above), and is better than or as good as every other service
- It works in China (unlike Google and some other online services)
- The pricing is very cheap — the free tier is enough for any individual language learner
The free tier lets you use the Neural voices 500,000 characters a month — this is easily enough for even the most ambitious language learners.
(Quick calculation — if you generously assume a word is 10 characters on average, and a sentence is 10 words, then that’s 100 characters per card. Even if made audio for both your native language and target language, that’s 2500 notes a month, or nearly 100 a day. I find 10-20 new notes a day to be my natural limit.)
How to create a Microsoft Azure API key for AwesomeTTS
Using your own Microsoft Azure API key is a good way to use AwesomeTTS for free — for up to 500000 characters a month, equating to thousands of new flashcards a month (!), more than any single language learner would need.
If you find the idea of an API key confusing (e.g. you’re asking “what’s an API?”) then you might find the below too much. The below is for technically inclined people who want to give it a crack.
Using an API key means you’ll be charged if you go over the free limit. This includes if someone else uses your key, by the way. It’s not ever going to break the bank… unless someone steals your key and goes nuts!
In a nutshell, to get an Azure API key for AwesomeTTS you have to
- Sign up to Azure (go here and click on Start Free) and agree to all the terms and conditions, including paying for it eventually (you won’t; and even if you somehow get to more than 500,000 characters a month, they’ll give you warning before charging you)
- Create a Microsoft account if you don’t have one (same as you’d use for Windows, Live, Skype etc.).
- Confirm your Azure account using a credit card (which might block people from some countries, unfortunately) — you’ll get some small test holds on your card
- Once you’ve created your account, in the Azure dashboard, create a “Speech” service and give it any name you want (the fields aren’t important). Create it for a local server (e.g. one near you).
- Note: Take note of the location of the server. You have to know this for configuring AwesomeTTS.
- Create an API key (they look like “a10ns7r1ng0fl3773r5aNdnu44b3rs”)
- Enter the API key into AwesomeTTS when configuring the voice.
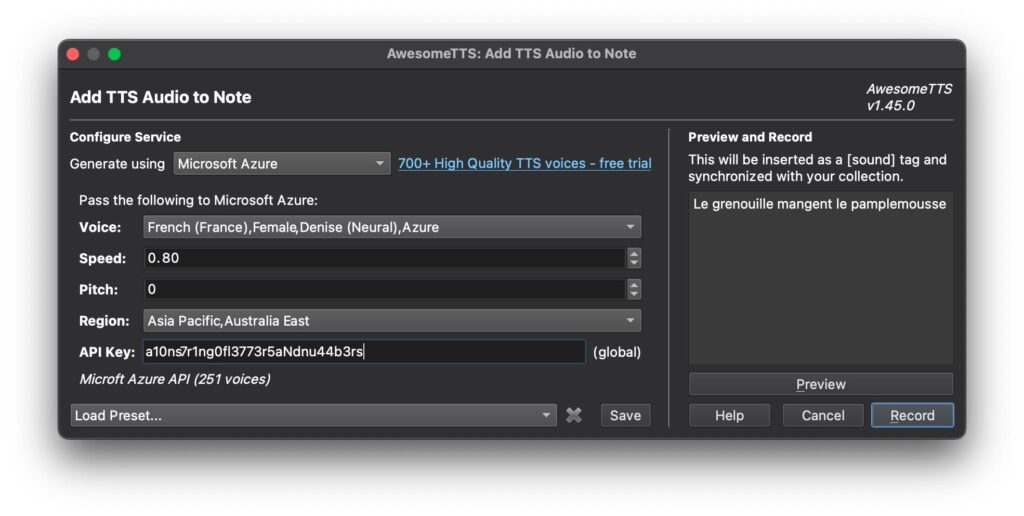
I’d also set up some alerts in your Azure account for when you start getting near your limits.
So that’s all a little complicated — a bit hacky to save you $5 a month (how it’s currently priced). Which is almost nothing, but I know these fees add up for people, $5 here, a $30 textbook there, a few $10 lessons a month…
Note, because of the number of visitors to this website I can’t provide 1:1 customer support, but leave a note below and I can address it as I get to i).

